How do you build memory and virtualized time series data with Raspberry Pi?
When talking about the benefits of the Internet of Things and developers, mentioning the Raspberry Pi will soon be part of the conversation. For those unfamiliar, the Raspberry Pi is a small computer with powerful features in a small package. It can be "used for whatever you want" and has a large number of project examples demonstrating its versatility. With the recent release of the Raspberry Pi 4 Model B, you get faster CPU, 4K support and up to 4GB of RAM.
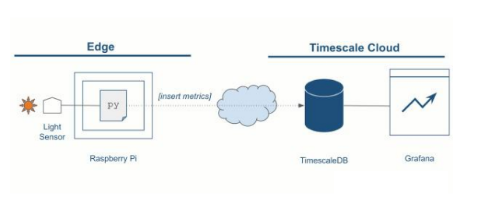
In the IoT environment, developers can use the Raspberry Pi as a prototype for large-scale edge planning. Here, we are interested in exploring how to run edge hardware, pushing time series data from the hardware to TimescaleDB, and configuring the visualization of the data in Grafana. To demonstrate this, in this article we will show you how to create an IoT system based on the Raspberry Pi ("Edge") and TImescale Cloud (for hosted TImescaleDB and hosted Grafana).

Although this demo is small (that is, using a single Raspberry Pi device), you can actually extend this demo on thousands of devices using the same settings.
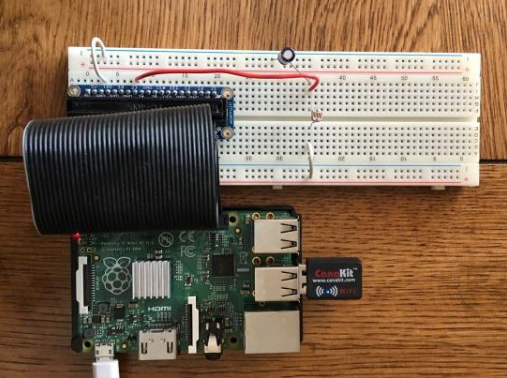
First, we will discuss the settings of our system. “The Edge” is a Raspberry Pi that is connected to a photocell light sensor. Running on the device is a script (photoresister.py) that records the state of the light sensor at 5 Hz. Each observation is sent to a TImescaleDB instance (hosted on TImescale Cloud) and recorded in hypertext. The Grafana instance (also hosted on Timescale Cloud) connects to the database to visualize the light values.
All of the following code and detailed instructions can be found in this GitHub repository.
Two things need to be created in Timescale Cloud: a TimescaleDB instance (used to store light sensor readings sent from the device) and a Grafana instance (used to visualize data in TimescaleDB). If you don't already have an account, sign up for Timescale Cloud (the first time users get a $300 trial credit). Log in and create a new TimescaleDB instance.
After a few minutes, the database instance is up and ready to use. Use psql (or a similar SQL client) to connect to the database and create a schema.
After running the TimescaleDB instance and using the schema, you can create a new Grafana instance.

Next, log in to the Grafana instance and configure the TimescaleDB instance as a data source. With a data source, you can create a Grafana dashboard that connects to the data source and display the data in TimescaleDB. You can create dashboards by importing the Grafana dashboard JSON here.

